


Scientists have discovered that chocolate was invented at least 3,100 years ago in Central America and not as the sweet treat people now crave, but as a celebratory beer-like beverage and status symbol.
Researchers identified residue of a chemical compound that comes exclusively from the cacao plant - the source of chocolate - in pottery vessels dating from about 1100 BC in Puerto Escondido, Honduras.
Chocolate was originally invented as a celebratory beer-like beverage and status symbol for the Aztecs and the Maya
This pushed back by at least 500 years the earliest documented use of cacao, an important luxury commodity in Mesoamerica before European invaders arrived and now the basis of the modern chocolate industry.
Cacao (pronounced cah-COW) seeds were used to make ceremonial beverages consumed by elites of the Aztecs and other civilizations, while also being used as a form of currency.
The Spanish conquistadors who shattered the Aztec empire in the 16th century were smitten with a chocolate beverage made from cacao seeds served in the palace of the emperor.
However, this was not the form in which cacao had its beginnings.
"The earliest cacao beverages consumed at Puerto Escondido were likely produced by fermenting the sweet pulp surrounding the seeds," the scientists wrote in the journal Proceedings of the National Academy of Sciences.
One of the researchers, anthropologist John Henderson of Cornell University in Ithaca, New York, said cacao beverages were being concocted far earlier than previously believed - and it was a beer-like drink that started the chocolate craze.

"What we're seeing in this early village is a very early stage in which serving cacao at fancy occasions is one of the strategies that upwardly mobile families are using to establish themselves, to accumulate social prestige.
"I think this is part of the process by which you eventually get stratified societies," Henderson said.
Steps involved in preparing this marvelous & tasty chocolate :
Making chocolate from the bean isn't easy. Chocolate companies invest millions of dollars into tools and machinery to turn bitter cacao beans into delicious chocolate bars. But with many hours -- or possibly days -- of hard work and dedication to detail, along with some equipment of your own, you can turn your kitchen into a miniature chocolate factory! By following these instructions and techniques, you'll be able to make your very own brand of chocolate.


- If roasting in your oven, you will need to do a bit of experimenting because roasting times depend on the type of bean you're using. Lay the beans in a single layer across a cookie sheet. Start off with an 18 minute roast in a preheated oven at 120 degrees C (250 F). They'll be ready when they start to crack and when they actually taste like chocolate (let them cool before tasting!).
- For roasting larger quantities of cocoa beans, you may want to invest in a drum, which is rotated over a gas grill.
For roasting larger quantities of cocoa beans, you may want to invest in a drum, which is rotated over a gas grill.

- 2. Crack and winnow the beans.
- You can crack the beans with a hammer and remove the husks (which should be loose after proper roasting) by hand if you are working with a small batch.For larger batches, you can use a very coarse, Corona type mill or purchase .a specialized mill (shown here, also see Citations below) to crack the beans into nibs. (In case you were wondering, a meat grinder doesn't work.
- 3. Grind the nibs into a cocoa liqueur.
- You will need equipment strong enough to liquefy the nibs and separate the remaining husks. General food processors, Vita-Mix, coffee grinders (burr and blade), meat grinders (manual and electric) mortar and pestles, and most juicers will not work. You may need to experiment to find equipment that gets the job done. Many home chocolatiers find success with a "Champion Juicer"[(see Citations below). Feed the nibs into the juicer one handful at a time, being sure to push them in gently (not forcefully) or else the motor may overheat. Cocoa liqueur will come through the screen and a mixture of husks and liqueur will find its way through the spout. Feed this mixture through the juicer again until only the husk comes through the spout.
- 4. Conch and refine the chocolate.
- By definition, conching affects the characteristic taste, smell and texture of the chocolate, while refiningreduces the size of the cocoa solids and sugar crystals. Both processes can be applied at the same time with a powerful wet grinder (success has been reported with a Spectra 10 melanger, also called the "Stone Chocolate Melanger"[ see Citations below). How you conch and refine the chocolate will depend on what equipment you use, but here are guidelines for the Spectra 10 melanger:
- Melt the chocolate and the cocoa butter in the oven to about 120 degrees F.
- Combine with non-fat dry milk powder, sugar, lecithin and a vanilla pod (split and soaked in the cocoa butter 1 hour; this is an optional flavoring).
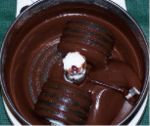
- Pour the chocolate mixture in the grinder, periodically pointing a hair dryer at it for 2-3 minutes to keep the chocolate melted during the first hour (until the friction created by grinding keeps the chocolate liquid without additional heat being needed).
- Continue refining for at least 10 hours and no more than 36 hours, until the chocolate tastes smooth and balanced, but be sure not to over-refine (or it will get gummy).
- Melt the chocolate and the cocoa butter in the oven to about 120 degrees F.
5. Temper the chocolate.
This is likely the most difficult part of the process, but it ensures that the chocolate will be shiny and have a "snap" to it, rather than being matte and soft enough to melt in your hands. However, the great thing about tempering is you can do it as many times as you like and the chocolate won't be ruined. Alternatively, you can purchase a tempering machine on the Internet for $300-400 (US). The most important thing is that you do not let any moisture in the chocolate, or it will be ruined.
This is likely the most difficult part of the process, but it ensures that the chocolate will be shiny and have a "snap" to it, rather than being matte and soft enough to melt in your hands. However, the great thing about tempering is you can do it as many times as you like and the chocolate won't be ruined. Alternatively, you can purchase a tempering machine on the Internet for $300-400 (US). The most important thing is that you do not let any moisture in the chocolate, or it will be ruined.
- Melt your chocolate carefully. You can accomplish this in the oven if you are using larger quantities of chocolate, or you can use a double broiler on the stove. It's your choice, just make sure that the chocolate does not burn (keep stirring) and you melt more than 1.5 pounds of chocolate. Any less and tempering could prove difficult. When the chocolate is melted to a temperature of around 110 or 120 degrees F, transfer it to a dry, cool bowl and stir until the chocolate temperature drops to about 100 degrees F. Use a candy thermometer to gauge the temperature. The chocolate in the bowl should remain at the same temperature while you work with chocolate outside of the bowl.
- Pour about one third of the contents of the bowl onto a hard, non-porous counter top or other surface (granite or marble works best). Spread the chocolate out with the spatula, and then bring it all back together.
- Continue doing this (for about 10-15 minutes) until the chocolate is about 85 degrees F. By the time the chocolate cools down to that point, the chocolate should be a thick, gooey mass.
- Add some of the 100 degree F chocolate from the bowl to get the chocolate workable again. Gently work the chocolate around.
- Return the chocolate back into the bowl with the 100 degree chocolate. Stir it gently, and try not to create bubbles.
- Check the chocolate's temperature. You want it around 90 degrees F, but never over 92 degrees F. Anything higher than this and you may need to temper the chocolate again.


7. Remove the chocolate from the molds when the chocolate is hardened. The molded chocolate should have a glossy appearance and should snap cleanly in two. If you are unsatisfied with your chocolate, you may re-temper the chocolate as long as the chocolate remains dry and you haven't burned it.


gud work rags, keep it up.........
ReplyDeletethank u
ReplyDelete